
In this 3 part series, we’re going to look at utilizing a $10 Raspberry Pi zero as a remote wireless video recorder, perfect for a wide host of applications which I will explore more in my next series.
In the first part, we will go through the initial setup of the Raspberry Pi, creating a simple Qt powered code interface, add in a basic GUI to preview the camera as well as the ability to start, stop and save & transcode the HD video.
Part two is all about using what we’ve done in part one and expanding the functionality, adding in recording time, stamping timecode on transcode, changing frame rates and resolutions.
Finally in part 3 we realize the remote portion with these Pi’s acting as service, streaming the preview as well being remotely controlled from a central server application.
So let’s get into it. Firstly the hardware.
The Raspberry Pi W is a great piece of kit, costly very little and has the on board ability to encode a 1080p stream at 30 fps, which costs about $10 on its own, but more commonly about $30 with a case, heatsink and power supply in a set
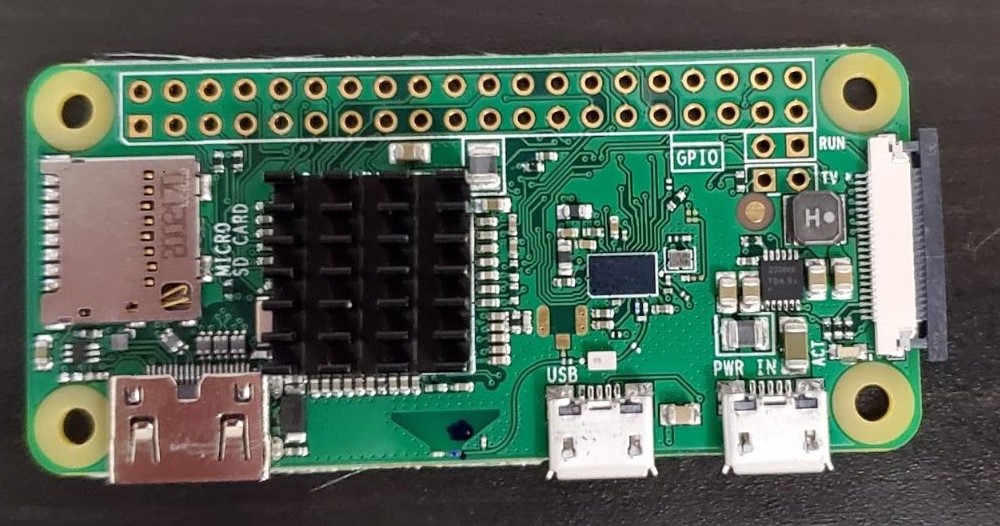
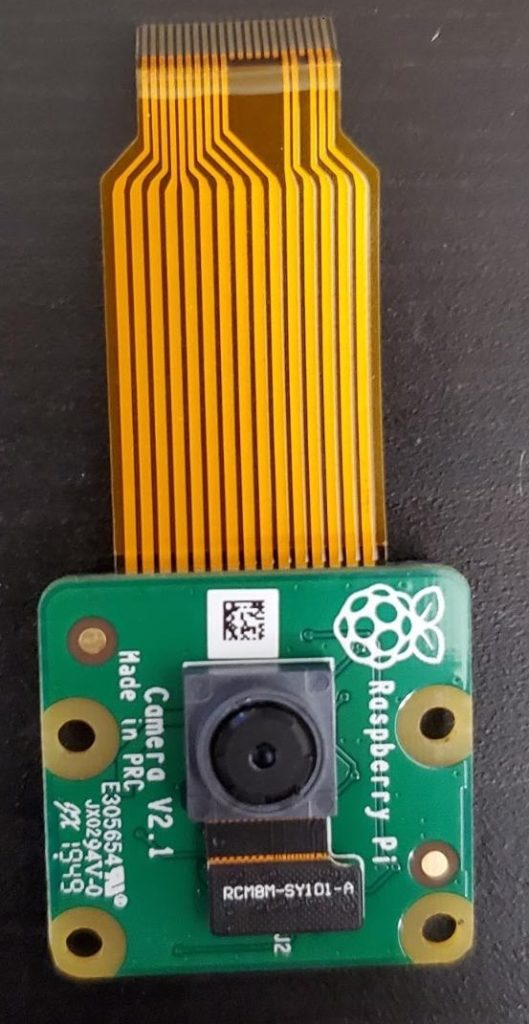
Next up is the PiCamera V2, whilst is possible to use a V1 camera, or even the new HQ camera, the PiCamera V2 is a great piece of kit, costing about $30. The Pi Zero uses a smaller cable to connect the camera than the one it comes with.
A MicroSD card is needed as the internal storage on the Pi, my goto brand is Samsung or Scandisk, and whilst you can use other brands, i’ve found that I’ve un-debuggable problems with cheaper cards.
I would highly recommend using the official Raspberry Pi setup documentations on the setup of the SD card which can be found here.
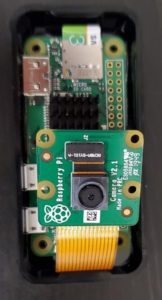
With the camera plugged in, the SD card inserted, its time to close the case and power it on to start the fun.
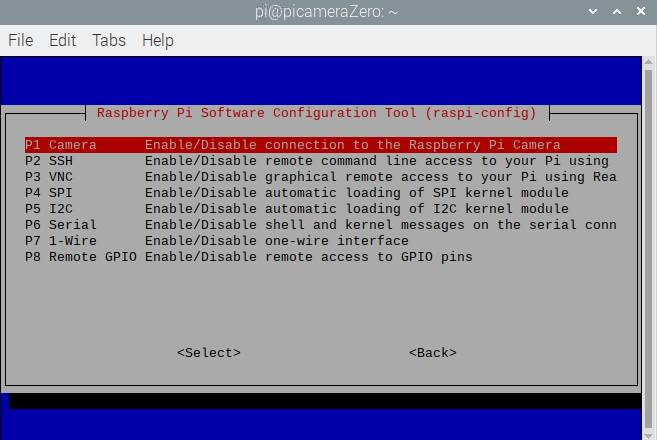
Once the Pi has started up, we need to enable the Pi Camera in the settings, we can do this with this:
sudo raspi-config
And choosing Interface->Camera->Enable from the menu. THis is also a great time to enable VNC, set the hostname, set the boot to autologin to desktop as well as set the resolution to mode 85 (1920×1080). All of which is very helpful if you are wanting to use Pi remotely rather than physically.
The last piece of software that we’ll need for this is PySide for the Python based GUI. We can get this by running:
sudo apt-get install python-pyside
With the setup done and out of the way, we can go-ahead and start coding!
The Python wrapper for the camera is the picamera module. We’ll be using this as our base class, but wrapping it with Qt to allow for callbacks as status changes.
The Camera can be in two states; recording and stopped, so making a Python enum for this allows for us to know the state, particularly useful on the UI interaction side.
class PiCameraStatus(object):
    """
    The Status that the PiCamera can be in
    """
    RECORDING = "Recording"
    STANDING_BY = "Standing By"
One UI element that is needed, is Widget which will show a QPixmap image, centering and resizing the image to the same size of the widget whilst maintaining the aspect ratio. The underlying concept is very straightforward, the paintEvent method is overridden and if a QPixmap is set on the widget, we rescale it the size of the widget and draw it.
The reimplemented sizeHint method is to give the widget some default parameters when it is created.
class ImageWidget(QtGui.QWidget):
    """
    Simple Widget to show a QPixmap image
    """
    def __init__(self, image=None):
        """
        Constructor

        kwargs:
            image (QPixmap): The widget's image
        """
        super(ImageWidget, self).__init__()
        self._image = None
        self.setImage(image)

    def setImage(self, image):
        """
        Set the image for the widget

        args:
            image (QPixmap): The image to show
        """
        self._image = image
        self.repaint()

    def sizeHint(self):
        """
        ReImplemented Method

        The size hint of the widget
        """
        return QtCore.QSize(100, 100)

    def paintEvent(self, event):
        """
        ReImplemented Method

        Draw a gray background and the image centered and re-sized to current widget size
        """
        painter = QtGui.QPainter(self)

        painter.setRenderHint(QtGui.QPainter.Antialiasing)
        painter.fillRect(0, 0, self.width(), self.height(), QtCore.Qt.gray)

        if self._image is not None:
            pixSize = self._image.size()
            pixSize.scale(event.rect().size(), QtCore.Qt.KeepAspectRatio)
            scaledPix = self._image.scaled(pixSize, QtCore.Qt.KeepAspectRatio, QtCore.Qt.SmoothTransformation)
            xOffset = (self.width() - pixSize.width()) / 2.0
            yOffset = (self.height() - pixSize.height()) / 2.0
            painter.drawPixmap(QtCore.QPoint(xOffset, yOffset), scaledPix)

        painter.drawRect(0,0, self.width(), self.height())
        painter.end()
?
Wrapping the PiCamera API to be Qt centric is pretty straightforward. Using QtCore.QObject as a base, we can define any signals that we might want to emit and build the class constructor.
Here we use tempfile to get the temporary file so we can record and only at the end when we want to save it do we need to give it a final filename.
class PiCameraWrapper(QtCore.QObject):
    """
    A Qt aware wrapper around the Pi's camera API

    Signals:
        cameraStatusChanged (PiCameraStatus): Emitted when the camera's status changes
        recordingStarted (): Emitted when the recording is started
        recordingStopped (): Emitted when the recording is stopped
        """
    cameraStatusChanged = QtCore.Signal(object)
    recordingStarted = QtCore.Signal()
    recordingStopped = QtCore.Signal()

    _TEMP_FILE = os.path.join(tempfile.gettempdir(), "piCamera", "temp.h264")

    def __init__(self):
        """
        Constructor
        """
        super(PiCameraWrapper, self).__init__()

        # Setup the camera
        self._camera = picamera.PiCamera()
        self._camera.resolution = (1920, 1080)
        self._camera.framerate = 30
        self._setStatus(PiCameraStatus.STANDING_BY)

        # Remove any old temp data
        if os.path.exists(self._TEMP_FILE):
            os.remove(self._TEMP_FILE)
As the status is a property, we’ll need some methods to get and set it, which is also a great place to emit the cameraStatusChanged signal with the new status.
 def status(self):
        """
        Get the current camera's status

        returns:
            PiCameraStatus
        """
        return self._cameraStatus

    def _setStatus(self, newStatus):
        """
        Set the current camera's status

        args:
            newStatus (PiCameraStatus): The camera's new status
        """
        self._cameraStatus = newStatus
        self.cameraStatusChanged.emit(self._cameraStatus)
To start the recording, there is some house keeping that we need to do to make sure that the temp file folder does exist, creating it if it doesn’t, before passing that into the internal PiCamera’s start_recording method. The last steps of this method just set the camera’s status and emit that the recording has started.
    def startRecording(self):
        """
        Start recording
        """
        if not os.path.exists(os.path.dirname(self._TEMP_FILE)):
            os.mkdir(os.path.dirname(self._TEMP_FILE))
        self._camera.start_recording(self._TEMP_FILE)
        self._setStatus(PiCameraStatus.RECORDING)
        self.recordingStarted.emit()
In a very similar way the stop recording method just calls the internal stop_recording method on the PiCamer before changing the status and emitting that the recording has stopped.
    def stopRecording(self):
        """
        Stop the recording
        """
        self._camera.stop_recording()
        self._setStatus(PiCameraStatus.STANDING_BY)
        self.recordingStopped.emit()
The saveRecording method takes the resulting .h264 file from the PiCamera, stored in the temp directory, and uses FFMPEG to transcode it into .mp4 file using subprocess.
    def saveRecording(self, outputPath):
        """
        Save the recording
        """
        if not os.path.exists(self._TEMP_FILE):
            raise ValueError("No Recording to save!")

        if not os.path.exists(os.path.dirname(outputPath)):
            os.mkdir(os.path.dirname(outputPath))
        cmds = ["ffmpeg",
                "-nostdin", # Make sure that FFMPEG isnt waiting for any user input
                "-y", # override file
                "-framerate", str(self._camera.framerate), # Set the frame rate
                "-i", self._TEMP_FILE, # Define the input file
                "-c", "copy", # Tell FFMPEG to copy the memory rather than encode and decode it
                outputPath] # Output file path
        subprocess.Popen(cmds)
In order to get a current preview of what the camera is seeing, we need a method to get the current camera data off the video buffer. We can do this with the PiCamera’s capture method using the use_video_port arg. Writing that buffer into an BytesIO class, we can then read that data as a QImage class.
    def getPreveiw(self):
        """
        Get the current preview stream as a QImage

        returns:
            QImage of the preview data
        """
        previewData = io.BytesIO()
        self._camera.capture(previewData, "jpeg", use_video_port=True)
        previewData.seek(0)
        return QtGui.QImage.fromData(previewData.read())
Finally on this class we have to add options to close the camera and set the camera rotation as well, which are extremely basic
    def setRotation(self, rotValue):
        """
        Set the camera rotation

        args:
            rotValue (int): Rotation amount, can be either 0, 90, 180, 270
        """
        self._camera.rotation = rotValue

    def closeCamera(self):
        """
        Close the camera
        """
        self._livePreivew.stop()
        self._camera.close()
To really take advantage of the PiCamera being a Qt Object, we need to add a thread in to poll for new frames, emitting them so the top level tool can display them. The general outline of the QThread class is based off an earlier one I wrote for the _SignalBeaconsThread from my last article “Lighting the cross-application signal beacons” but without the thread sleeping.
class LivePreviewThread(QtCore.QThread):
    """
    Thread for polling for new frames from the camera

    signals:
        newPreviewFrame (QImage): The new frame as an QImage
    """
    newPreviewFrame = QtCore.Signal(object)

    def __init__(self, camera):
        """
        Constructor
        """
        super(LivePreviewThread, self).__init__()
        self._camera = camera
        self._isRunning = False
        self._app = None

    def run(self):
        """
        ReImplemented method.

        Main loop logic
        """
        # Hook into the QApplications close event to make sure the thread is stopped with the processed
        if self._app is None:
            self._app = QtCore.QCoreApplication.instance() or QtGui.QApplication.instance()
            self._app.aboutToQuit.connect(self._handleAppClosing)

        # Mark the process as running
        self._isRunning = True

        # Just keep running until we tell it to stop
        while self._isRunning is True:
            newImage = self._camera.getPreveiw()

            # Check the thread is still running
            if self._isRunning is False:
                break

            # Emit the new frame image
            self.newPreviewFrame.emit(newImage)

    def stop(self):
        """
        Stop the thread.
        """
        self._isRunning = False
        self.terminate()

    def _handleAppClosing(self):
        """
        Handle the QApplication closing, making sure that the thread is stopped before the process stops
        """
        self.stop()
The thread instance should live within the Qt PiCamera wrapper, re-emmiting any new frames as part of its code, resulting in a small change to the constructor.
class PiCameraWrapper(QtCore.QObject):
    """
    A Qt aware wrapper around the Pi's camera API

    Signals:
        cameraStatusChanged (PiCameraStatus): Emitted when the camera's status changes
        recordingStarted (): Emitted when the recording is started
        recordingStopped (): Emitted when the recording is stopped
        newPreviewFrame (QImage): Emitted with a new Preview Frame
    """
    cameraStatusChanged = QtCore.Signal(object)
    recordingStarted = QtCore.Signal()
    recordingStopped = QtCore.Signal()
    newPreviewFrame = QtCore.Signal(object)

    _TEMP_FILE = os.path.join(tempfile.gettempdir(), "piCamera", "temp.h264")

    def __init__(self):
        """
        Constructor
        """
        super(PiCameraWrapper, self).__init__()

        # Setup the camera
        self._camera = picamera.PiCamera()
        self._camera.resolution = (1920, 1080)
        self._camera.framerate = 30
        self._setStatus(PiCameraStatus.STANDING_BY)

        # Remove any old temp data
        if os.path.exists(self._TEMP_FILE):
            os.remove(self._TEMP_FILE)

        # Setup the preview thread
        self._livePreivew = LivePreviewThread(self)
        self._livePreivew.newPreviewFrame.connect(self.newPreviewFrame.emit)
        self._livePreivew.start()
With all the pieces moved into place, the last thing to do is to build the final tool interface which will hold all the UI elements and let the user control the camera. The design is simplistic, with slots for the changes on the PiCameraWrapper status updates.
class PiCameraWidget(QtGui.QWidget):
    """
    Main tool window for viewing and controlling the Pi Camera
    """
    def __init__(self, parent=None):
        """
        Constructor
        """
        super(PiCameraWidget, self).__init__(parent=parent)
        self._camera = PiCameraWrapper()

        self.setupUi()

        self._camera.newPreviewFrame.connect(self._handleNewPreviewFrame)
        self._camera.cameraStatusChanged.connect(self._handleCameraStatusChange)
        self._camera.recordingStarted.connect(self._handleCameraStartRecording)
        self._camera.recordingStopped.connect(self._handleCameraStopRecording)

        self.setWindowTitle("Local Pi Camera Recording")

    def setupUi(self):
        """
        Set up the UI
        """
        # Layouts
        layout = QtGui.QHBoxLayout()
        configLayout = QtGui.QGridLayout()

        # Widgets
        self._previewLabel = ImageWidget()
        configPanel = QtGui.QWidget()

        self._rotationCombo = QtGui.QComboBox()
        self._statusLabel = QtGui.QLabel(self._camera.status())
        self._stopRecording = QtGui.QPushButton("Stop Recording")
        self._startRecording = QtGui.QPushButton("Start Recording")
        self._saveRecording = QtGui.QPushButton("Save Recording")
        self._outFileEdit = QtGui.QLineEdit()

        # Configure Widgets
        self._previewLabel.setSizePolicy(QtGui.QSizePolicy.Expanding, QtGui.QSizePolicy.Expanding)
        configPanel.setSizePolicy(QtGui.QSizePolicy.Minimum, QtGui.QSizePolicy.Minimum)
        self._stopRecording.setVisible(False)
        self._rotationCombo.addItem("No Rotation", 0)
        self._rotationCombo.addItem("-90", 270)
        self._rotationCombo.addItem("+90", 90)
        self._rotationCombo.addItem("+180", 180)
        self._outFileEdit.setText(os.path.join(os.path.expanduser("~"), ""))

        # Layouts to Widgets
        configLayout.addWidget(QtGui.QLabel("Status:"), 0, 0)
        configLayout.addWidget(self._statusLabel, 0, 1)
        configLayout.addWidget(QtGui.QLabel("Rotation:"), 1, 0)
        configLayout.addWidget(self._rotationCombo, 1, 1)
        configLayout.addWidget(self._startRecording, 2, 0, 1, 2)
        configLayout.addWidget(self._stopRecording, 3, 0, 1, 2)
        configLayout.addWidget(QtGui.QLabel("Output:"), 4, 0, 1, 2)
        configLayout.addWidget(self._outFileEdit, 5, 0, 1, 2)
        configLayout.addWidget(self._saveRecording, 6, 0, 1, 2)

        layout.addWidget(self._previewLabel)
        layout.addWidget(configPanel)

        configPanel.setLayout(configLayout)
        self.setLayout(layout)

        # Signals
        self._startRecording.pressed.connect(self._handleStartRecording)
        self._stopRecording.pressed.connect(self._handleStopRecording)
        self._saveRecording.pressed.connect(self._handleSaveRecording)
        self._rotationCombo.currentIndexChanged.connect(self._handleRotationChange)

    def _handleCameraStatusChange(self, newStatus):
        """
        Handle the PiCameraWrapper's change of status, pushing the new status to the UI
        """
        self._statusLabel.setText(newStatus)

    def _handleRotationChange(self, newValue):
        """
        Handle the change of rotation, pushing the new value to the camera
        """
        rotValue = self._rotationCombo.itemData(self._rotationCombo.currentIndex(), QtCore.Qt.UserRole)
        self._camera.setRotation(rotValue)

    def _handleNewPreviewFrame(self, newPreviewFrame):
        """
        Handle getting a new preview frame, pushing it to the image viewer widget
        """
        self._previewLabel.setImage(QtGui.QPixmap(newPreviewFrame))

    def _handleCameraStartRecording(self):
        """
        Handle the camera starting recording, updating the UI accordingly
        """
        self._stopRecording.setVisible(True)
        self._startRecording.setVisible(False)

    def _handleCameraStopRecording(self):
        """
        Handle the camera stopping recording, updating the UI accordingly
        """
        self._stopRecording.setVisible(False)
        self._startRecording.setVisible(True)

    def _handleStartRecording(self):
        """
        Handle start button being pressed
        """
        self._camera.startRecording()

    def _handleStopRecording(self):
        """
        Handle the stop button being pressed
        """
        self._camera.stopRecording()

    def _handleSaveRecording(self):
        """
        Handle the save button being pressed
        """
        fileName = self._outFileEdit.text()
        if not fileName.endswith(".mp4"):
            fileName = "{}.mp4".format(fileName)
        try:
            self._camera.saveRecording(fileName)
        except ValueError, error:
            QtGui.QMessageBox.warning(self, "PiRecording", str(error))
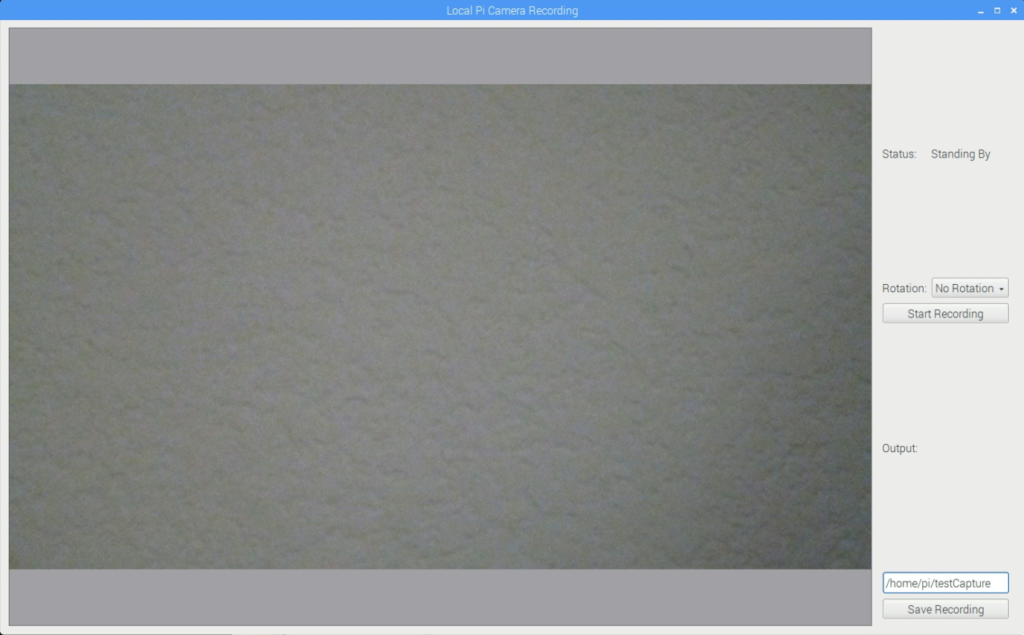
As you can see the tool’s interface is very simple, it gives users the ability to start, stop and save the videos, as well as setting the rotation and being able to preview what is being recorded.
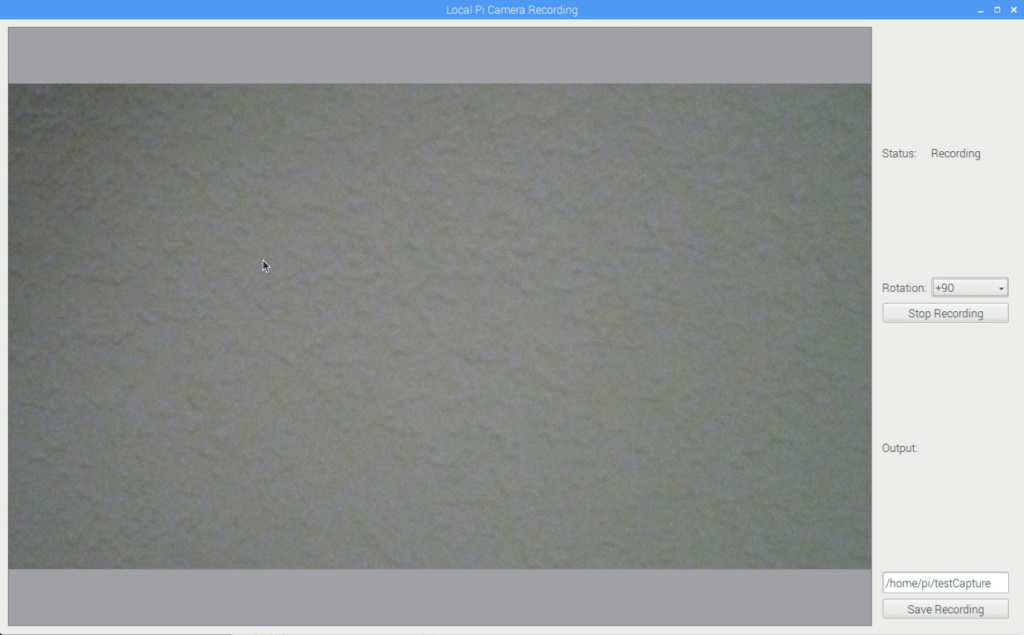
As the status changes from standing by to recording, you can see the status change in the UI
In the next article we’ll extend this with a lot more features to make it a more fully fleshed out tool.
– Geoff
1 thought on “Remotely capturing on the Pi – Part One”
Comments are closed.