This was an article written for CodeProject.com back in 2012, and has been posted on here as well as on their site. In this small article, I look at porting a C# project over into PyQt and show you just how easy it is, as well as how flexible the PyQt framework is in action.
The original article can be found at https://www.codeproject.com/Articles/373463/Painting-on-a-Widget
Introduction
This article was based around a similar article I wrote about a year ago, where we implement drawing on a panel in C#, and now we’re taking the main structure of this and porting it to the Python Version of Qt, PyQt. The Original article can be found here.
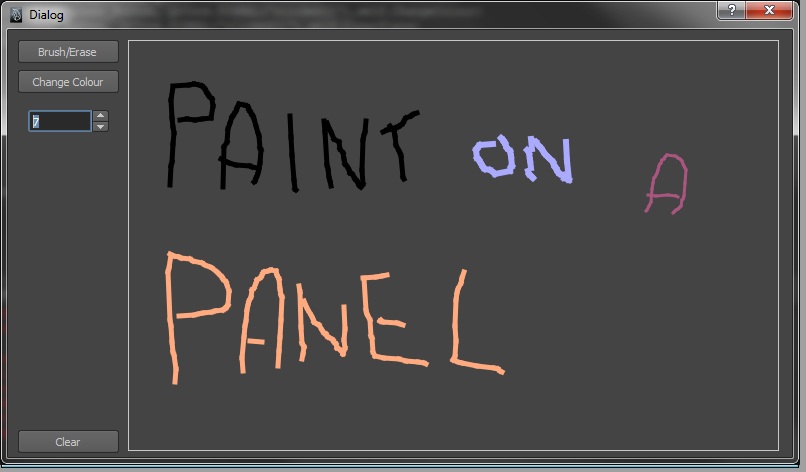
So we’re be looking at how to design and implement the ability to paint onto a widget, drawing lines and the ability to erase them, whilst still allowing the user to customize the size and colour of the paint brush.
This approach to drawing graphics is more aligned to vector type graphics where the points are floating point values rather than rasterized bitmap graphics where each pixel has a colour.
Side Note: I use PyQt within a programme called Maya 2012, as that’s my normal development environment for it, this code does not use any Maya 2012 python commands so should work perfectly fine when used with IDLE or any other python IDE.
Background
The article is set at a simple entry level; we will cover creating classes, creating widgets and using event handlers. You will need PyQt installed and working with whatever Python IDE you are using.
Using the code
So one of the best things of Qt, is the graphical UI designer that comes with Maya 2012 by default. This programme can be found in the same folder that Maya.exe can be, usually C:\Program Files\Autodesk\Maya2012\bin.
Other version of Qt and PyQt come with this, and its location will usually be in the root Qt folder on the C:\ drive.
UI Desinger
The UI’ve designed is exactly the same as the C# one created a year ago, to show how the code can be ported over easily.
Below is the UI in the designer, and just below that is the list of the widgets, their names, types, positions and sizes so you can exactly re-create this.
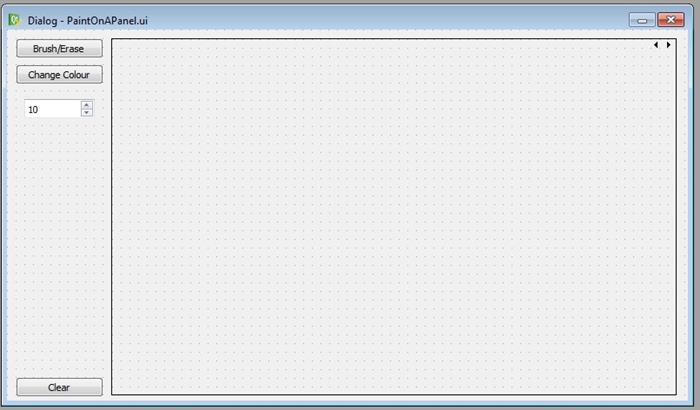
| Widget Types | objectName | Position | Size |
QPushButton | BrushErase_Button | 10,10 | 101,23 |
QPushButton | ChangeColour_Button | 10,40 | 101,23 |
QPushButton | Clear_Button | 10,400 | 101,23 |
QStackedWidget | DrawingFrame | 120,10 | 651,411 |
QSpinBox | Thickness_Spinner | 20,80 | 81,22 |
Once this is all designed, we can save it out as a .UI file, I suggest in a common place for scripts, as you need to hardcode in the address of the file, so don’t put it too far out the way!!
Ok so with the UI all complete, we need to jump into our Python IDE, with for me, is Maya 2012.
Python Side
With the UI all created and saved out, we need to start off by getting python to show display the UI. The code is fairly self-explanatory and is generic.Hide Copy Code
from PyQt4 import QtGui,QtCore, uic
uifile = 'G:/3D work/Python Scripts/Tuts/Paint on a panel PyQt/PaintOnAPanel.ui'
form, base = uic.loadUiType(uifile)
class CreateUI(base, form):
    def __init__(self):
        super(base,self).__init__()
        self.setupUi(self)

def main():
    global PyForm
    PyForm=CreateUI()
    PyForm.show()

if __name__=="__main__":
    main()
Running this script will create a new PyQt window with the form that we designed and saved out. Simple part done.
To support the code, we need to create a few addition classes that will hold data, and work with the held data to remove and add new points, as well as saving vital information such as colour and size of the brush strokes.
The Classes
There are 4 new classes we need to implement, the Colour3 Class; which will just hold the RGB colour values, the Point class; which will hold the X and Y coordinate, the Shape class; which holds information about that point, such as position, colour, size, and what shape this point is attached to, and the Shapes class; which will hold all the shape’s with functions to create, retrieve and remove them.
Additionally there is another class, the Painter class, but this is a widget class, so we’ll come to this later.
## My Own Colour Class, simple and light weight
class Colour3:
    R = 0
    G = 0
    B = 0
    #CONSTRUCTOR
    def __init__(self):
        self.R = 0
        self.G = 0
        self.B = 0
    #CONSTRUCTOR - with the values to give it
    def __init__(self, nR, nG, nB):
        self.R = nR
        self.G = nG
        self.B = nB
## My Own Point Class, simple and light weight
class Point:
    #X Coordinate Value
    X = 0
    #Y Coordinate Value
    Y = 0
    #CONSTRUCTOR
    def __init__(self):
        self.X = 0
        self.Y = 0
    #CONSTRUCTOR - with the values to give it
    def __init__(self, nX, nY):
        self.X = nX
        self.Y = nY
    #So we can set both values at the same time
    def Set(self,nX, nY):
        self.X = nX
        self.Y = nY
Both of these two classes are very simple, so I won’t explain them, they’re just there to hold small amounts of data.
The Shape class is there to hold data on that particular drawing point, such as its position, the width of the shape, the colour and the shape number so we can link all the same shape objects together
# Shape class; holds data on the drawing point
class Shape:
    Location = Point(0,0)
    Width = 0.0
    Colour = Colour3(0,0,0)
    ShapeNumber = 0
    #CONSTRUCTOR - with the values to give it
    def __init__(self, L, W, C, S):
        self.Location = L
        self.Width = W
        self.Colour = C
        self.ShapeNumber = S
The Shapes class is there to hold all the drawing point information and allow quick and easy to use functions to the drawing panel regarding the drawing point data.
class Shapes:
    #Stores all the shapes
    __Shapes = []
    def __init__(self):
        self.__Shapes = []
    #Returns the number of shapes being stored.
    def NumberOfShapes(self):
        return len(self.__Shapes)
    #Add a shape to the database, recording its position,
    #width, colour and shape relation information
    def NewShape(self,L,W,C,S):
        Sh = Shape(L,W,C,S)
        self.__Shapes.append(Sh)
    #returns a shape of the requested data.
    def GetShape(self, Index):
        return self.__Shapes[Index]
    #Removes any point data within a certain threshold of a point.
    def RemoveShape(self, L, threshold):
        #do while so we can change the size of the list and it wont come back to bite me in the ass!!
        i = 0
        while True:
            if(i==len(self.__Shapes)):
                break
            #Finds if a point is within a certain distance of the point to remove.
            if((abs(L.X - self.__Shapes[i].Location.X) < threshold) and (abs(L.Y - self.__Shapes[i].Location.Y) < threshold)):
                #removes all data for that number
                del self.__Shapes[i]
                #goes through the rest of the data and adds an extra
                #1 to defined them as a seprate shape and shuffles on the effect.
                for n in range(len(self.__Shapes)-i):
                    self.__Shapes[n+i].ShapeNumber += 1
                #Go back a step so we dont miss a point.
                i -= 1
            i += 1
For now, let’s just create a simple dummy widget that we can integrate into the main UI and then come back later and flesh it out.
This code will create a new class which will inherit from the PyQt widget class, so we can use it within the Stacked Widget control.
class Painter(QtGui.QWidget):
    Dum = 0 #we'll remove this later
    def __init__(self,parent):
        super(Painter, self).__init__()
Main Form
Now let’s jump to setting up the main bulk of the UI interactions, so we can finish up with the creation of our own custom widget.
Just like the C# version, we need some variables to hold data such as; if we’re drawing or erasing, the currently selected colour and the current shape number among others. We can quickly declare these under the CreateUI class, before we get to the constructor.
class CreateUI(base, form):
    Brush = True
    DrawingShapes = Shapes()
    IsPainting = False
    IsEraseing = False
    CurrentColour = Colour3(0,0,0)
    CurrentWidth = 10
    ShapeNum = 0
    IsMouseing = False
    PaintPanel = 0
Before we can connect the PyQt buttons with the code, we need to define the functions which they will call. Four buttons means four functions:
SwitchBrush function simply changes a variable from true to false, or from false to true, so that we can be in erase mode or paint mode.
ChangeColour function opens up a Qt Colour swatcher allowing users to select the colour they want, and saving that so we can use it later
ChangeThickness takes the new value of the spinner box and sets that as the current line width.
ClearSlate clears all the data arrays so we can start over again.
def SwitchBrush(self):
    if(self.Brush == True):
        self.Brush = False
    else:
        self.Brush = True
def ChangeColour(self):
    col = QtGui.QColorDialog.getColor()
    if col.isValid():
        self.CurrentColour = Colour3(col.red(),col.green(),col.blue())
def ChangeThickness(self,num):
    self.CurrentWidth = num
def ClearSlate(self):
    self.DrawingShapes = Shapes()
    self.PaintPanel.repaint()
To link up the PyQt buttons with the functions, we just declare the connection within a function and make sure we add that function call to the class constructor.
def Establish_Connections(self):
    QtCore.QObject.connect(self.BrushErase_Button, QtCore.SIGNAL("clicked()"),self.SwitchBrush)
    QtCore.QObject.connect(self.ChangeColour_Button, QtCore.SIGNAL("clicked()"),self.ChangeColour)
    QtCore.QObject.connect(self.Clear_Button, QtCore.SIGNAL("clicked()"),self.ClearSlate)
    QtCore.QObject.connect(self.Thickness_Spinner, QtCore.SIGNAL("valueChanged(int)"),self.ChangeThickness)
While we’re adding that function call to the class constructor, we might as well add the code to insert the new widget class into the stacked-widget widget. Here we create an instance of the Painter widget class and save a reference to the main class so we can re-call it, as well as set this widget as the current widget on the stacked-widget widget.
#Constructor
def __init__(self):
    super(base,self).__init__()
    self.setupUi(self)
    self.setObjectName('Rig Helper')
    self.PaintPanel = Painter(self)
    self.PaintPanel.close()
    self.DrawingFrame.insertWidget(0,self.PaintPanel)
    self.DrawingFrame.setCurrentWidget(self.PaintPanel)
    self.Establish_Connections()
That’s the code complete for the main UI, we have just to define how we can use all this date we’ve stored within our new widget to allow users to draw on the widget.
Custom Widget Class
Within our own custom widget, called Painter, we need to start off by defining a few variables which we will use, defining them in the same fashion we did with the variables within the Main UI class.
ParentLink is a reference link to the Main UI parent class so we can data from it such as the colour and size, as well as holding the point arrays.
MouseLoc is the Point of where the mouse is.
LastPos is the Point of where the mouse last was.
It would be good to note that a lot of the variables could be held within the Painter Widget class making it self-sufficient, but I did it this way to show how we can interact between widgets without the need for global variables.
Within the constructor, set MouseLoc and LastPos to default values, and grab the parent and store that under ParentLink.
class Painter(QtGui.QWidget):
    ParentLink = 0
    MouseLoc = Point(0,0)
    LastPos = Point(0,0)
    def __init__(self,parent):
        super(Painter, self).__init__()
        self.ParentLink = parent
        self.MouseLoc = Point(0,0)
        self.LastPos = Point(0,0)
All the call-backs within the widget will be done by event handlers, such as the mousePressEvent event so we know when the user has clicked on the widget, and the paintEvent event so we can override the paint event and it can draw what we want it to. Let’s start with the mouse events!
The mousePressEvent is triggered when the mouse button is clicked down. It’s a simplistic function which checks what mode is wanted, and set that mode to active as well as setting this as a new shape through the self.ParentLink.ShapeNum += 1 line.
#Mouse down event
def mousePressEvent(self, event):
    if(self.ParentLink.Brush == True):
        self.ParentLink.IsPainting = True
        self.ParentLink.ShapeNum += 1
        self.LastPos = Point(0,0)
    else:
        self.ParentLink.IsEraseing = True
The mouseMoveEvent is triggered when the mouse is moved whilst within the widgets area. The function checks to see if we are activity drawing or erasing, and if we drawing add a new point at mouse pointers current location or if we’re erasing, remove points at the mouse current location.
#Mouse Move event
def mouseMoveEvent(self, event):
    if(self.ParentLink.IsPainting == True):
        self.MouseLoc = Point(event.x(),event.y())
        if((self.LastPos.X != self.MouseLoc.X) and (self.LastPos.Y != self.MouseLoc.Y)):
            self.LastPos =  Point(event.x(),event.y())
            self.ParentLink.DrawingShapes.NewShape(self.LastPos,self.ParentLink.CurrentWidth,self.ParentLink.CurrentColour,self.ParentLink.ShapeNum)
        self.repaint()
    if(self.ParentLink.IsEraseing == True):
        self.MouseLoc = Point(event.x(),event.y())
        self.ParentLink.DrawingShapes.RemoveShape(self.MouseLoc,10)
        self.repaint()
The mouseReleaseEvent is triggered when the mouse button is released, and it simply sets all the active modes to off, so we will not be drawing when we don’t want to.
#Mose Up Event
def mouseReleaseEvent(self, event):
    if(self.ParentLink.IsPainting == True):
        self.ParentLink.IsPainting = False
    if(self.ParentLink.IsEraseing == True):
        self.ParentLink.IsEraseing = False
The last call-back we override in our new widget class is the paintEvent, and simply put, it’s the function which is called to re-draw the widget. We use this function to draw what we want on the widget.
def paintEvent(self,event):
    painter = QtGui.QPainter()
    painter.begin(self)
    self.drawLines(event, painter)
    painter.end()
To accompany this function we have a separate function called drawLines as I like to separate out my drawing commands into separate functions so it’s easier to work with.
The drawLines function simply goes through the list of points, and draws a line between conjoining points if there shape numbers match, meaning there from the same shape, using the colour and pen width saved with that particular point.
def drawLines(self, event, painter):
    painter.setRenderHint(QtGui.QPainter.Antialiasing);
    for i in range(self.ParentLink.DrawingShapes.NumberOfShapes()-1):
        T = self.ParentLink.DrawingShapes.GetShape(i)
        T1 = self.ParentLink.DrawingShapes.GetShape(i+1)
        if(T.ShapeNumber == T1.ShapeNumber):
            pen = QtGui.QPen(QtGui.QColor(T.Colour.R,T.Colour.G,T.Colour.B), T.Width/2, QtCore.Qt.SolidLine)
            painter.setPen(pen)
            painter.drawLine(T.Location.X,T.Location.Y,T1.Location.X,T1.Location.Y)
That’s it!! You now have a UI which you can draw on.
Points of Interest
I hope this encourages you to explore what else you can do with PyQt, and how easy it is to port a C# project over to PyQt and similarly to C++ Qt.
– Geoff Samuel